Click LIKE!

Wednesday, January 15, 2014

Telekung from Jenna

Assalamualaikum to all,

I'm safely received my courier from Jenna.I bought 2 pairs of telekung,one is in turquoise with white lace and magenta plain colour.The material is fully Lycra and very comfy.The design is also simple yet perfect I can say, for a simple muslimah like me :)

How about the price?The one with the lace is at RM230 and the plain one is at RM140 each,with additional postage of RM10.There are few more beautiful colours and designs.You can visit their instagram JENNABYOHP or like their facebook fanpage Jennamuslimwear.Happy shopping :)

Tuesday, January 14, 2014

Ayu Mee Udang Teluk Kumbar

I just came back from having some mee udang, located at Teluk Kumbar.I went there with my family and we ordered varieties of menu such as mee kuah udang,mee goreng udang & nasi goreng udang.The foods are based on prawn.The prawns served were quite big and fresh.To get there,you can just google map " Mee Udang Ayu".

In my opinion,I would prefer the mee udang in Sg Dua as it tasted better than this.Overall,I can give rate of 3/5 for "Mee Udang Ayu" restaurant.
Keow Teow Kuah Udang

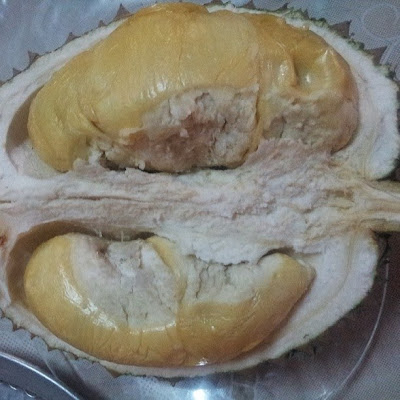
In addition,I also had "durian" today.It tasted marvelous.Even there were 2 "durian kucing tidur", as you can see below picture attached.What I can say,the texture is soft,taste creamy and sweet.

Durian Kucing Tidur

Monday, January 13, 2014

Yogurt for Dry Skin

Hello readers,
I'm on 1 week holidays from daily work.So,I'm now at my hometown Bukit Mertajam,Penang, the heaven of foods.
Actually,these few days, I experienced dry skin of my face.Pimples are like everywhere on my face especially on forehead and cheek.As been told before in the previous post,I wanted to start over again a home spa project.So, I start with the very simplest one,only 1 ingredient that is yogurt.I choose to go for greek natural plain yogurt because it has thick texture,so that when you apply on face it won't drip out of your face.

You just need a simple step for this yogurt mask.Just take a spoon of yogurt and apply it on your face.Wait until 20 - 30 minutes,then rinse off with lukewarm water.For the best result,make sure you repeat this step 3x a week or you can do it everyday for the beginning.


Friday, January 10, 2014

Strawberry Ice Cream Recipe

Remember I posted an entry about ice cream maker?I've tried making some ice cream with it.

What is the best time to prepare the ice cream?

  1. If you are a career woman like me,I would suggest you to keep the ice cream maker bowl in the freezer around 6.30 am, a day before you wanted to make the ice cream.It need to be frozen for 24 hours at least.Or else,it won't work.
  2. You can prepare the mixture at night,maybe after dinner.Some recipe needs to be stored in the fridge for overnight,but some you can just prepare the mixture on the spot or by the time you are ready to make the ice cream.Once the mixture/custard is ready,cover them with plastic wrap,make sure the plastic wrap touches the top on the mixture.
  3. On the next morning,you can start making the ice cream.Place the ice cream bowl on the machine,turn on the machine,pour the mixture and you are ready to go.Normally,it takes about 20 to 30 minutes for the ice cream to get harden,however it depends on the ice cream machine itself.So,make sure you read first all the instructions in the manual before started making the ice cream.Once done,you can transfer the ice cream inside an air tight container and keep it in the freezer for at least 8 hours before they are ready to be eaten.And now you can get ready for work :).Isn't simple and organized?
In the manual,you can see there are few recipes for you to try .I've tried the strawberry ice cream recipe,it is simple and you don't have to keep the mixture overnight.Below is the recipe.

Strawberry Ice Cream
Ingredients:-
  • 300gm fresh strawberry
  • 75gm caster sugar
  • 100ml whipping cream
  • 1 small size lemon juice
Process:-

Blend the strawberry until it becomes puree.Then,mix all the ingredients well.Turn on the ice cream machine,pour slowly the mixture.Wait until 20-30 minutes or until it gets harden.Transfer the ice cream inside air tight container and keep in the freezer for at least 8 hours.Ready to serve.


Thursday, January 9, 2014

Macaroni & Cheese

Hello readers :)
My baking passion is back!After almost 1 years plus I left my baking hobby due of some reasons,but now I'm happy that passion is suddenly appears,when I watched an internet cooking show "Laura In the Kitchen".

My husband loves western food,totally a little bit different from me,where I love Asian food.So,I think I need to learn how to make homemade western food,so that we can save some and eat healthy food. At least ,we know what are the ingredients that we used.

I always wanted to try making homemade mac & cheese.Hence,I searched recipe over the internet and I found that the recipes are quite simple and just need little time to prepare for it.So,below recipe is taken from website of Laura In The Kitchen.I can say that the taste is pure western way,but no harm to give a try.

Ingredients:-
½ lb of Corkscrew Pasta (or any shape of pasta you like), cooked according to package directions and drained->I used only 250gm.1/2lb or almost 500g is too much for me.4 Tbsp of Unsalted Butter4 Tbsp of FlourSalt and Pepper to taste2 cups of Whole Milk, warmed in either a microwave or in a small pan1 cup of Extra Sharp Cheddar, grated2 cups of Mozzarella, grated->1 cup for the white sauce,and 1 cup for the topping
½ cup of Parmiggiano Reggiano, grated->I don't used this because it is not available in the market.However,I substitute this with another 1 cup of cheddar cheese¼ cup of Bread Crumbs4 Oz of Pancetta, cut into small dice->I used slices of beef tenderloin,marinate it with white pepper+salt1 tsp of Olive oil

Process:-
Preheat your oven to 400 degrees F = 204 degree C

1) Sautee the pancettatenderlion slices with the olive oil in a small sauté pan over medium high heat until the pancettatenderlion slices is crispy and cooked well, drain with a slotted spoon onto a small plate and set aside.

2) In a large saucepan over medium heat, melt the butter and add the flour. Stir it together and cook it for about a minute.

3) While constantly stirring, slowly add the milk and cook it for about 4 to 5 minutes or until the milk turns into a custard consistency. Season with salt and pepper to taste and take off the heat. Add all of the grated cheddar, mozzarella and half of the parmiggiano, stir until all of the cheeses have melted, add in the cooked and drained pasta and mix together until everything is well combined.

4 Put the mac and cheese into a casserole dish and sprinkle the bread crumbs and mozarella cheesethe remaining parmiggiano evenly over the top, drizzle a touch more of olive oil over the top and bake for about 20 to 25 minutes or until the top is golden and bubbly.


So,this is how my mac & cheese looks like.It's crunchy on top yet so creamy inside :)


Before went into the oven

After baked

Tuesday, January 7, 2014

Home Spa, It's been so long

Oh,seriously it's been so long tak buat home spa.Dulu-dulu zaman bujang suka sangat tempek-tempek yogurt kat muka,sapu yogurt kat rambut,lulur & scrub badan and mandi susu(walaupon xdak bath tub,besen pon jadi la).Sekarang ni I dunno why malas semacam,maybe sebab ada benda lain yang lebih penting nak kena buat and I have limited time.

So,I'm thinking of to start over again this year.Nak aktifan balik diri memanjakan diri kat rumah.Maybe I can do it on every free weekend.I need to start buying some natural ingredients such as yogurt & oat,which these two are used a lot in home spa recipe.

I hope this will be not only hangat-hangat tahi ayam as I realized now I need to take care of my body from head to toe.Even skin getting rough already :(.Next week I'm going back to Penang.Will start this home spa project once I'm back home.

See ya :)

Saturday, January 4, 2014

Ikan Kembung Masak Tempoyak Ala Perak

Hello to all,
This is my first post in 2014,it is about recipe :)

Ini cerita Khamis lepas.Alkisahnya,dah tak tau nak masak apa untuk dinner.Yang tinggal dalam freezer cuma ikan kembung dan daging.So,memandangkan buntu apa yang nak di masak,Ezzy pon just google resepi ikan kembung kat internet.And,I found something that caught my eyes,ikan kembung masak tempoyak.Rupanya ikan kembung ni boleh masak tempoyak juga ya,selalunya guna ikan patin jer.Ezzy tak ingat dari blog mana Ezzy dapat resepi,tapi Ezzy akan share resepi yang Ezzy buat Khamis lepas.Lebih kurang sama dengan mana-mana resepi dalam internet,but ada tukar-tukar sikit ikut bahan-bahan yang ada di rumah.


Bahan-bahan:-
  • 4 Ikan Kembung
  • Air secukupnya
  • 1 inci kunyit hidup
  • 6 Cili Padi
  • Garam secukup rasa
  • 4 sudu tempoyak
  • Timun (Optional)
Cara-cara:-
  1. Blendkan air,kunyit hidup,tempoyak & cili padi.
  2. Masukkan bahan yang sudah diblend ke dalam periuk.Panaskan sehingga mendidih.
  3. Kemudian,masukkan ikan dan juga timun.Biar sehingga timun lembut.Ready to serve.
Senangkan resepi ni.Very simple,fast and easy.Resepi yang Ezzy share style Perak,but I still prefer style Temerloh :).Anyway,both styles are good and delicious to me.I would suggest you guys to have combination of sambal belacan and ulam-ulaman when you eat gulai tempoyak.

Selamat mencuba :)


Blog Template by YummyLolly.com